Google Translate Camera & Photo Translation makes it easy to translate foreign text without typing it manually. Typing out a full paragraph of foreign text just to translate it is slow and annoying, but the camera feature in Google Translate solves that problem completely by letting you point your phone at anything with text and get an instant translation overlaid right on the screen. Here’s how the camera translation feature works and how to use it well. If you’re still setting the app up for the first time, our complete Google Translate guide covers installation and basic setup before you get to this feature.
What the Camera Feature Actually Does
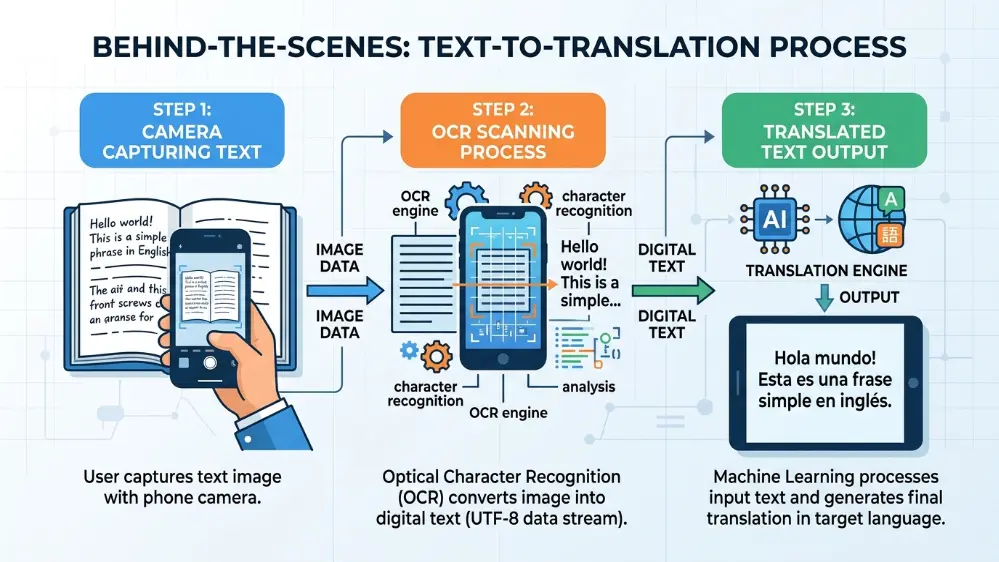
Behind the scenes, the app uses optical character recognition, commonly shortened to OCR, to read the text in your camera view. Once it identifies the words, it runs them through Google’s translation engine and displays the result directly over the original text on your screen, matching the font size and layout as closely as it can manage.
This whole process happens in a fraction of a second for short text, which is why live camera mode feels almost instant when you’re scanning a simple sign or label. Longer or denser blocks of text take slightly more processing time, though rarely more than a second or two even on older phones.
How to Use Camera Mode
Open the app and tap the camera icon at the bottom of the screen. You’ll get two options: instant translation, which overlays text live through your camera feed, or import, which lets you translate an existing photo already saved on your phone. The instant mode is especially useful if you already snapped a picture of a menu or document earlier and forgot to translate it in the moment.
The first time you use camera mode, the app may take a second to download the specific language pack needed for offline OCR processing. After that initial download, camera translation for that language works even without an internet connection, which is genuinely one of the more impressive parts of the feature.
Using the Picture Translate Feature on Saved Images
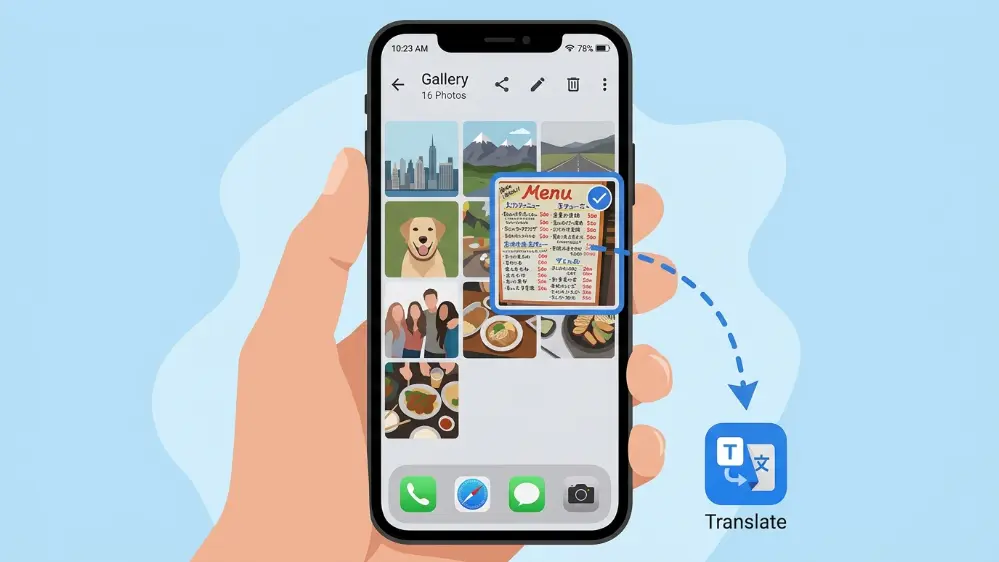
If you’re looking to translate images already sitting in your phone’s gallery rather than pointing your camera live at something, you don’t need a separate tool for this. Inside camera mode, tap the import button in the bottom left corner, select any photo from your gallery, and the app will scan and translate the text within it automatically.
This comes in handy more often than people expect. Screenshots of foreign-language social media posts, photos sent by a friend, or scans of a document someone emailed you can all be dropped into this feature without retyping a single word.
Live Camera Mode vs Importing a Saved Image
There’s a real difference between scanning a static image and using live camera translation, and knowing which to use for which situation makes a noticeable difference in accuracy. Importing a saved photo tends to be slightly more accurate because the app can take its time analyzing a clear, still image rather than processing a constantly shifting camera feed.
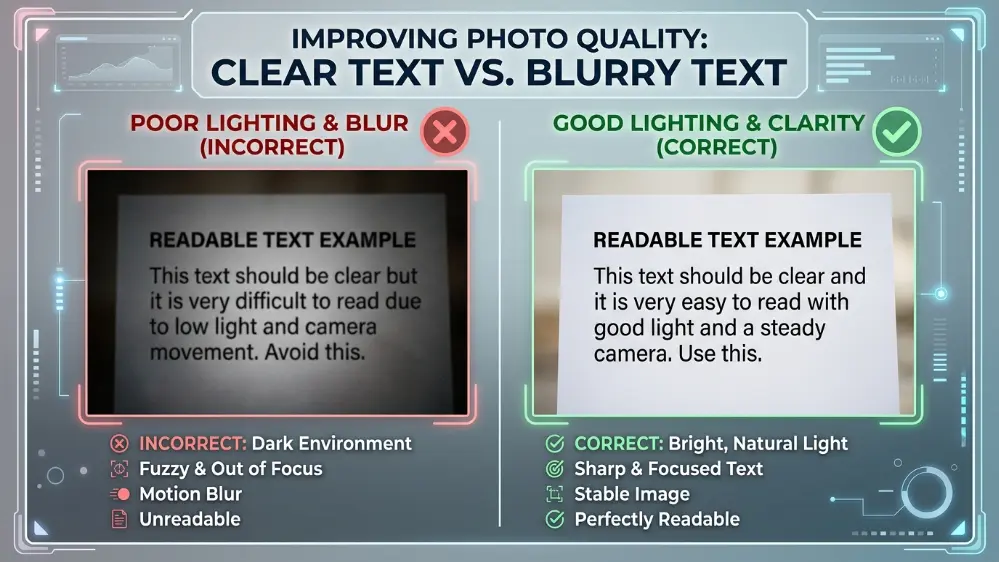
Live camera mode is faster since there’s no need to actually take a photo first, but it can struggle with blurry text, low light, or unusual fonts like handwriting or heavily stylized signage. For quick, simple scans like a street sign or a short menu item, live mode is fine. For anything dense or important, like a full page of a document, snap a clear photo first and use import mode instead.
Tips for Better Camera Translation Accuracy
Good lighting makes a huge difference in how well OCR can identify individual characters. Hold your phone steady and get close enough that text fills a good portion of the frame without cutting words off at the edges, since partial words often translate incorrectly or not at all.
Curved or wrinkled paper, like a laminated restaurant menu or a crumpled receipt, can confuse the OCR system because the text isn’t sitting flat and straight in the frame. Flatten the surface out as much as possible before scanning if you have the option to do so.
Reflective surfaces cause similar problems. Glossy menus, laminated signs, or glass-covered displays often create glare that obscures part of the text, so try angling your phone slightly to avoid direct light reflecting straight back into the camera lens.
Where This Feature Shines
Camera translation is best for menus, street signs, product labels, and printed documents where the text is reasonably clean and well-formatted. It’s not built for translating handwritten notes reliably, since handwriting varies too much from person to person for OCR to consistently recognize accurately.
Dense pages of small text, like a full page from a book or a lengthy contract, sometimes need to be split into smaller sections for best results, since trying to capture an entire page at once in a single frame can overwhelm the OCR engine and produce a messier result than scanning it in two or three passes.
Product packaging is another strong use case, particularly for ingredient lists or usage instructions written entirely in a language you don’t read. This is genuinely one of the more practical everyday uses of the feature beyond travel scenarios.
Combining Camera Mode With Other Features
Camera translation doesn’t have to work alone. If a scanned translation comes out a little rough or you want to double check a specific phrase, you can often follow up by typing the same text manually to compare results, or switch over to voice mode and read the original text aloud for a second opinion. Our full step-by-step usage guide walks through how these different input modes fit together as part of one overall workflow rather than separate, isolated tools.
If you’re dealing with a language that has a particularly complex or unfamiliar script, camera mode combined with the handwriting input feature can help you cross-check unusual characters that don’t scan cleanly on the first attempt.
Using Camera Translation for Indian Scripts
Regional Indian scripts like Tamil, Malayalam, Kannada, and Odia can be trickier for OCR to read accurately compared to Latin-based alphabets, partly because these scripts include compound characters and connected letterforms that vary more between fonts. If you’re regularly scanning text in one of these languages, a slightly closer, well-lit shot makes a bigger difference in accuracy than it would for English or Spanish text.
Our detailed guide on Google Translate support for Indian languages goes deeper into which regional languages perform most reliably and what to expect from each one, camera mode included.
Common Camera Translation Mistakes
A common mistake is trying to scan text through a phone case with a cracked or scratched camera lens cover, which introduces distortion the OCR engine struggles to compensate for. Another is scanning at an extreme angle rather than holding the phone roughly parallel to the text, which stretches letters just enough to occasionally trip up recognition.
People also sometimes expect camera mode to work instantly with zero setup on their very first international trip, only to discover the offline language pack wasn’t downloaded in advance. Test camera mode with your target language while you still have a stable connection at home, well before you actually need it abroad.
Scanning Business Documents and Signage While Traveling for Work
Business travel brings its own set of camera translation scenarios that differ a bit from tourist use cases. Contracts, invoices, shipping labels, and safety signage at a work site all show up more often than restaurant menus for people traveling internationally on business. The same core tips apply, good lighting and a flat, steady shot, but the stakes for accuracy are usually higher.
For anything with financial or legal weight, treat a camera-scanned translation strictly as a way to understand the general gist rather than a final, reliable version. Follow up with a proper human translation for signatures, contracts, or anything that could create liability if a nuance gets lost. Camera mode is excellent for quickly understanding what a document says in the moment, less so for producing something you’d want to act on without a second check.
How Camera Translation Compares to Other Apps
Google Translate isn’t the only app offering camera translation, though it remains one of the most refined implementations available. Microsoft Translator includes a similar feature with comparable accuracy for major languages, while some smaller, specialized apps focus specifically on camera translation for a narrower set of languages, sometimes with slightly better results for that specific niche.
For most people, sticking with Google Translate’s camera feature makes sense simply because it’s already installed and covers the widest range of languages in one place, rather than needing a separate specialized app for occasional use with a less common language. Our broader roundup of the best translation apps in 2026 compares camera and OCR performance across a few different options if you want a wider view before deciding what to keep installed.
Battery and Performance Considerations
Camera translation, especially in live mode, uses more battery than simple text translation since it keeps the camera sensor active continuously while processing frames in real time. If you’re relying heavily on camera mode throughout a full day of travel, keep a portable charger handy or lean on import mode more often, since scanning a single photo uses noticeably less battery than holding live mode open for extended periods.
Older phones with slower processors may also notice a slight lag in live camera translation compared to newer devices, particularly when scanning dense or unusually formatted text. If lag becomes a real problem, switching to import mode shifts more of the processing to a single scan rather than continuous live analysis, which tends to run more smoothly on older hardware.
Frequently Asked Questions
Does camera translation work without internet access?
Yes, once you’ve downloaded the relevant offline language pack in advance through the app’s settings menu.
Why does the translated text sometimes overlap or look jumbled on screen?
This usually happens with dense or oddly formatted text, where the app struggles to fit the translated overlay into the same visual space as the original. Switching to import mode and scanning a clearer, flatter image often resolves this.
Can camera mode translate text in unusual fonts or handwriting?
Handwriting recognition is unreliable through camera mode specifically. For handwritten text, the app’s separate handwriting input tool, where you draw characters directly on screen, tends to work better.
Is there a limit to how much text I can scan at once?
There’s no hard limit, but very dense pages are better split into smaller sections for more accurate results rather than scanning an entire page in one attempt.
Using Camera Mode for Kids’ Homework and Study Material
Camera translation has a quieter, everyday use case beyond travel: helping with homework or study material written in a second language. Parents helping kids with foreign language assignments, or students working through a textbook that includes passages in another language, can scan a paragraph and get a rough translation instantly instead of manually looking up unfamiliar words one at a time. It’s not a substitute for actually learning the language, but it removes a lot of friction from homework sessions that would otherwise stall out over a handful of unfamiliar words.
Final Thoughts
The camera feature is genuinely one of the most useful tools in Google Translate, especially when you’re traveling and don’t have time to retype long blocks of foreign text by hand. Get comfortable switching between live mode and image import depending on the situation, pay attention to lighting and angle, and you’ll rarely need to type anything manually again when you’re out and about dealing with menus, signs, or printed documents.